(6 intermediate revisions by the same user not shown)
Line 4:
Line 4:
|title =
|title =
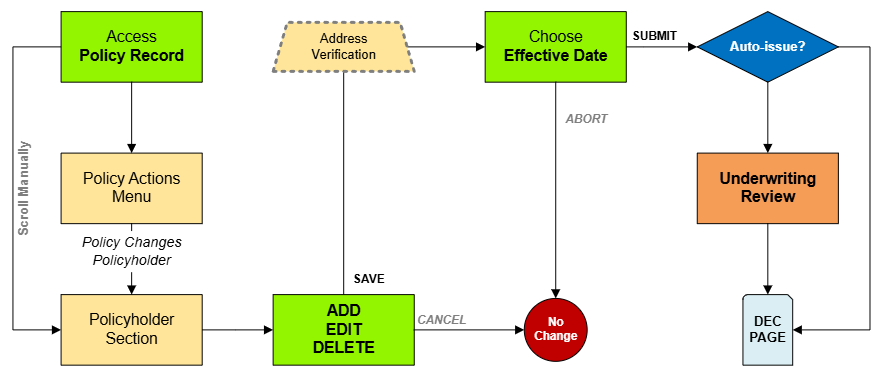
|text = This procedure explains how agents can request a [[NFIP Policy Assignment|policy assignment]]. A policy assignment transfers an NFIP policy from the current policyholder to a new policyholder due to a change in ownership.
|text = This procedure explains how agents can request a [[NFIP Policy Assignment|policy assignment]]. A policy assignment transfers an NFIP policy from the current policyholder to a new policyholder due to a change in ownership.
}}
{{img-proc-nofrm
|file = File:Img-vector-change-insured.png
|caption = Policy Changes require specific actions to meet federal guidelines
}}
}}
{{clear}}
{{clear}}
Line 65:
Line 69:
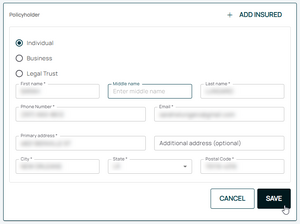
{{Box task
{{Box task
|image = Img-proc-change-insured-edit-fields.png
|image = Img-proc-change-insured-edit-fields.png
|size = 250px
|size = 300px
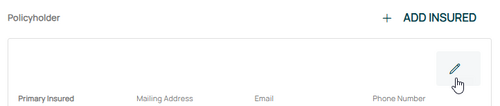
|alt = An image showing the options in the Policyholder section.
|alt = An image showing the options in the Policyholder section.
|caption = Make the appropriate entries to the policyholder details as needed.
|caption = Make the appropriate entries to the policyholder details as needed.
|text =
|text =
<big>'''Change Policyholder Details'''</big><br>
<big>'''Change Policyholder Details'''</big><br>
Make changes to the insured's legal status, name, email address, phone number, and mailing address.<br>
Make changes to the following:
* Legal status/entity
* Name
* Email address
* Phone number
* Mailing address.
Once all details are entered, click the "Save" button.
}}
}}
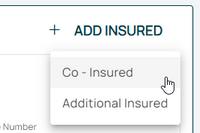
'''Once all details are entered, click the "Save" button. If co-insureds or additional insureds need to be added or removed, refer to the boxes below before moving to Step 4 below).'''
'''If co-insureds or additional insureds need to be added or removed, refer to the boxes below.'''<br>
If nothing else remains, move to Step 4 below.
}}
}}
Line 89:
Line 100:
* All starred fields are required.
* All starred fields are required.
}}
}}
'''Once all details are entered, click the "Save" button. If co-insureds or additional insureds need to be removed, refer to the box below before moving to Step 4 below).'''
'''If co-insureds or additional insureds need to be removed, refer to the box below.'''<br>
If nothing else remains, move to Step 4 below.
}}
}}
Line 105:
Line 117:
}}
}}
{{Attention|If chosen by accident, this can be undone by clicking the '''Abort''' button in the upper right.}}
{{Attention|If chosen by accident, this can be undone by clicking the '''Abort''' button in the upper right.}}
'''Once all details are entered, click the "Save" button. If no other changes are needed, move to Step 4 below).'''
If no other changes are needed, move to Step 4 below.
}}
}}
Line 121:
Line 133:
}}
}}
Scroll to the top of the page to enter the effective date.
Scroll to the top of the page to enter the effective date.
* Enter the appropriate date.
* The Effective Date should match the closing (transfer of ownership) date.
* Backdating to the inception date is allowed for corrections.
* Choose "None" for the [[Waiting Periods|Waiting Period]].
* Choose "None" for the [[Waiting Periods|Waiting Period]].
'''''The Policy Change cannot be completed without choosing an effective date.'''''
'''''The Policy Assignment cannot be completed without choosing an effective date.'''''
This procedure explains how agents can request a policy assignment. A policy assignment transfers an NFIP policy from the current policyholder to a new policyholder due to a change in ownership.