(28 intermediate revisions by the same user not shown)
Line 1:
Line 1:
{{info-nfip-sfip}}{{eq-proc-agent}}
{{info-nfip-sfip}}{{eq-proc-agent}}
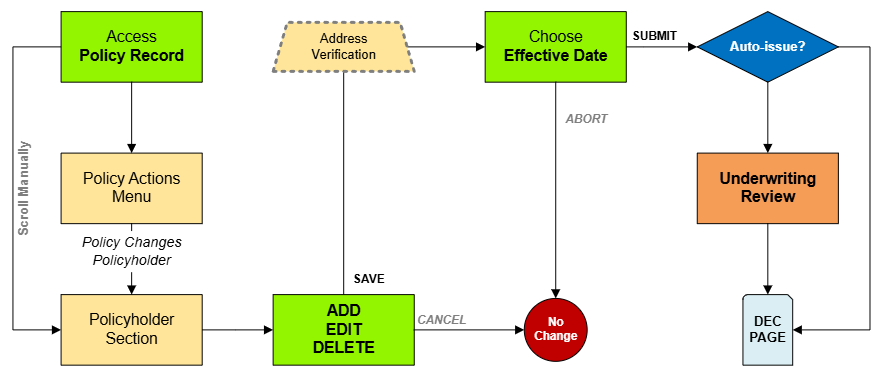
This page outlines the steps an agent will follow in the Equinox system to assign an NFIP policy to a new policyholder or agent of record.
{{box-summary
|color = blue
|title =
|text = This procedure explains how agents can request a [[NFIP Policy Assignment|policy assignment]]. A policy assignment transfers an NFIP policy from the current policyholder to a new policyholder due to a change in ownership.
}}
{{img-proc-nofrm
|file = File:Img-vector-change-insured.png
|caption = Policy Changes require specific actions to meet federal guidelines
}}
{{clear}}
== Procedural Steps ==
{{collapsible-section
|number = 1
|title = 1. Complete the Form
|content =
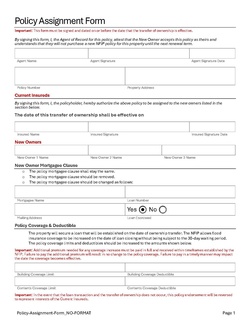
<div style="padding-bottom: 1em;"><big>'''Prepare the [[:File:Form-Policy-Assignment-01.pdf|Policy Assignment Form]]'''</big></div>
A specific form is not required to complete a Policy Assignment. <br>
However, the document shown here (click to open) has been created to assist agents with the process.
Complete the following fields:
* Policy Number
* Property Address
* Insured names and signatures (sellers)
* New insured names and signatures (buyers)
Add other details as applicable, such as the [[Mortgagee Clause]] or [[Primary Residence]] verification.<br>
'''Print or save the form, then upload it to the [[Policy Documents]].'''
}}
{{Attention|1=The form must be signed by seller on or before the closing date. The buyer has up to 30 days to submit to the insurer. [https://www.fema.gov/sites/default/files/documents/fema_nfip_flood-insurance-manual_042024.pdf#page=53]}}
<!-- END OF COLLAPSIBLE SECTION -->
}}
{{collapsible-section
|number = 2
|title = 2. Access Policy Record
|content =
{{Box task
|image = Img-proc-actions-change-insured.png
|size = 200px
|alt = An image showing the "Policy Changes" menu along the right side of the page.
|caption = Use the "Policy Changes" menu along the right side of the page.
|text = <big>'''Open the [[Policy Record]] to start'''</big>
To quickly navigate to the Policyholder section:
* Find the '''Policy Actions''' block on the right
* Choose '''Policy Changes'''
* From the next menu, click the '''Policyholder''' or '''Co-insured''' option
Otherwise, scroll down to the Policyholder section manually.
}}
<!-- END OF COLLAPSIBLE SECTION -->
}}
{{collapsible-section
|number = 3
|title = 3. Add, Edit, Delete
|content =
The Policy Assignment may require co-insureds or additional insureds to be added or deleted. The policyholder must be edited.
{{collapsible-details
|number = 31
|title = Edit Policyholder
|content =
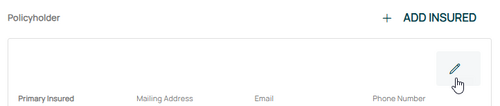
<big>Use the '''Edit button''' (pencil icon) in the upper right of the Policyholder section.</big><br>
{{Img-proc-free
|style = padding-top: 1em
|file = Img-proc-change-insured-edit-icon.png
|size = 500px
|caption = Use the Edit button (pencil icon) in the upper right of the Policyholder section.
}}
This will open the Insured fields for editing. <br>
{{Box task
|image = Img-proc-change-insured-edit-fields.png
|size = 300px
|alt = An image showing the options in the Policyholder section.
|caption = Make the appropriate entries to the policyholder details as needed.
|text =
<big>'''Change Policyholder Details'''</big><br>
Make changes to the following:
* Legal status/entity
* Name
* Email address
* Phone number
* Mailing address.
Once all details are entered, click the "Save" button.
}}
'''If co-insureds or additional insureds need to be added or removed, refer to the boxes below.'''<br>
If nothing else remains, move to Step 4 below.
}}
== Overview ==
{{collapsible-details
* A policy assignment transfers the insurable interest of an NFIP policy from one policyholder to another.
|number = 32
* This process may also include assigning or changing the agent of record on the policy.
|title = Add Insured
* Required documentation must be completed and available before submitting the assignment.
|content =
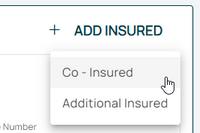
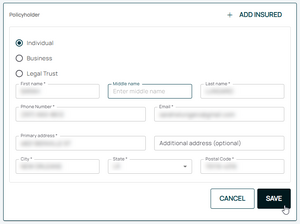
{{Box task
|image = Img-proc-change-insured-add.png
|size = 200px
|caption = After selecting the Add Insured button, choose either a co-insured or an additional insured.
|text =
When adding a new insured (co-insured or additional insured), click the "'''Add Insured'''" button in the upper right of the Policyholder section.
* Select "Individual", "Business", or "Legal Trust"
* Enter the contact details in the fields below.
* All starred fields are required.
}}
'''If co-insureds or additional insureds need to be removed, refer to the box below.'''<br>
If nothing else remains, move to Step 4 below.
}}
== Steps to Submit Policy Assignment ==
{{collapsible-details
# Log in to the Equinox system and locate the policy to be assigned.
|number = 33
## Use the search bar to find the policy by number, address, or current policyholder name.
|title = Delete Insured
## Confirm that the policy is eligible for assignment (e.g., active or recently expired status).
|content =
# Select the '''Assignment''' tab or menu option for the policy.
<big>Use the '''Delete button''' (trash can icon) in the upper right of the Co-insured or Additional Insured section.</big><br>
# Click the '''Submit Policy Assignment''' button to begin the process.
''The policyholder can be edited but not deleted.''
## If the button is not visible, verify that the policy meets eligibility requirements.
{{Img-proc-free
# Enter the details for the new policyholder:
|style = padding-top: 1em
## '''Policyholder Name''': Full legal name of the new policyholder.
|file = Img-proc-change-insured-delete.png
## '''Contact Information''': Email, phone number, and mailing address.
|size = 500px
## '''Effective Date of Assignment''': Ensure the date reflects when the assignment takes effect.
|caption = Use the Delete button (trash can icon) in the upper right of the Co-insured or Additional Insured section.
# Attach required documentation:
}}
## '''Proof of Transfer''': Legal documents showing transfer of insurable interest (e.g., deed, closing documents).
{{Attention|If chosen by accident, this can be undone by clicking the '''Abort''' button in the upper right.}}
## '''Signed Assignment Form''': Completed and signed by the current and new policyholders.
If no other changes are needed, move to Step 4 below.
# Review the information and attached documents for accuracy.
}}
# Submit the policy assignment.
## A confirmation message will appear with an assignment reference number.
## Notify the new policyholder and agent of record (if applicable).
== Common Issues ==
<!-- END OF COLLAPSIBLE SECTION -->
* Missing or incomplete documentation.
}}
** Ensure the proof of transfer and assignment form are valid and fully executed.
{{collapsible-section
* Assignment effective date conflicts.
|number = 4
** Verify the effective date aligns with policy terms and NFIP guidelines.
|title = 4. Choose Effective Date
* Policy status errors.
|content =
** Confirm the policy's eligibility before submission.
{{Img-proc-free
|style = padding-top: 1em
|file = Img-proc-change-insured-eff-date.png
|size = 700px
|caption = Choose "None" for the Waiting Period and select the appropriate Policy Change Effective Date.
}}
Scroll to the top of the page to enter the effective date.
* The Effective Date should match the closing (transfer of ownership) date.
* Choose "None" for the [[Waiting Periods|Waiting Period]].
'''''The Policy Assignment cannot be completed without choosing an effective date.'''''
This procedure explains how agents can request a policy assignment. A policy assignment transfers an NFIP policy from the current policyholder to a new policyholder due to a change in ownership.