(32 intermediate revisions by the same user not shown)
Line 5:
Line 5:
|title =
|title =
|text = NFIP Renewal Bills can be sent to the insured or other interested parties, such as a named mortgagee. This procedure will show how to update where the renewal bill will be sent.
|text = NFIP Renewal Bills can be sent to the insured or other interested parties, such as a named mortgagee. This procedure will show how to update where the renewal bill will be sent.
}}
{{Img-proc-nofrm
|file = File:Img-vector-change-billing.png
}}
}}
{{clear}}
{{clear}}
== Procedural Steps ==
{{collapsible-section
{{collapsible-section
|number = 1
|number = 1
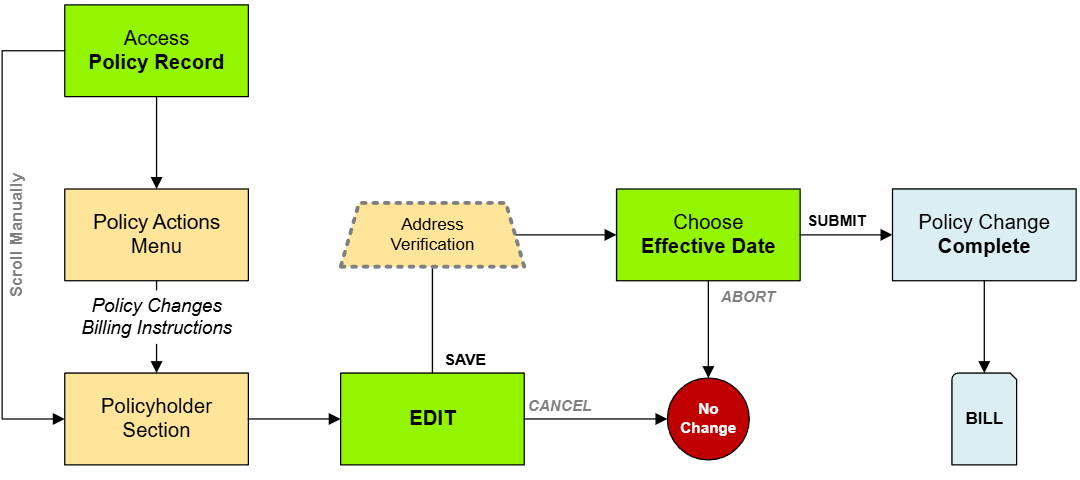
|title = Step 1: Find the Policy
|title = 1. Access Policy Record
|content =
|content =
* Log in to the Equinox platform and locate the policy requiring a billing update.
{{Box task
* Open the policy record and review the current billing information.
|image = Img-proc-change-billing.png
|size = 200px
|alt = An image showing the "Policy Changes" widget along the right side of the page.
|caption = Use the "Policy Changes" menu along the right side of the page.
|text = <big>'''Open the [[Policy Record]] to start'''</big>
To quickly navigate to the Policyholder section:
* Find the '''Policy Actions''' block on the right
* Choose '''Policy Changes'''
* From the next menu, click the '''Billing Instructions''' option
Otherwise, scroll down to the Policyholder section manually.
}}
<!-- END OF COLLAPSIBLE SECTION -->
}}
}}
{{collapsible-section
{{collapsible-section
|number = 2
|number = 2
|title = Step 2: Click "Check Out"
|title = 2. Edit
|content =
|content =
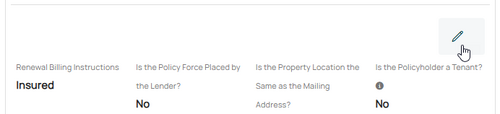
* Check out the policy record to make changes.
<big>Use the '''Edit button''' (pencil icon) below the Primary Insured contact details.</big><br>
* Ensure no other changes are being processed concurrently to avoid conflicts.
{{Img-proc-free
|style = padding-top: 1em
|file = Img-proc-change-billing-edit.png
|size = 500px
|caption = Use the Edit button (pencil icon) below the Primary Insured contact details to change the Renewal Billing Instructions field.
}}
This will open the Renewal Billing Instructions fields for editing.
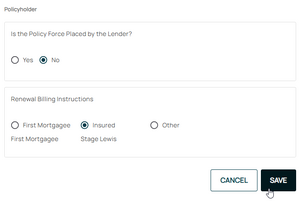
{{Box task
|image = Img-proc-change-billing-save.png
|size = 300px
|alt = An image showing the options in the Policyholder section.
|caption = Make the appropriate selections to the Renewal Billing Instructions as needed.
|text =
<big>'''Section 1:''' Is the Policy Force Placed by the Lender?</big>
If the lender (mortgagee) required the NFIP policy as a condition to a loan, then select the "Yes" radio button.<br>
NFIP Renewal Bills can be sent to the insured or other interested parties, such as a named mortgagee. This procedure will show how to update where the renewal bill will be sent.
Procedural Steps
1. Access Policy Record
Use the "Policy Changes" menu along the right side of the page.