
Submit NFIP Cancellation Request: Difference between revisions
No edit summary |
|||
| Line 107: | Line 107: | ||
|caption = Confirm who will receive the refund and where it should be sent. | |caption = Confirm who will receive the refund and where it should be sent. | ||
|text = The refund amount will be calculated by the effective date and the refund rules.<br> | |text = The refund amount will be calculated by the effective date and the refund rules.<br> | ||
Below the calculation, the agent has options to choose who will be paid and where the check will be mailed. | Below the calculation, the agent has options to choose who will be paid ("'''Pay to'''") and where the check will be mailed ("'''Mail refund to'''"). | ||
If the Insured buttons are used, the refund will be paid and sent using the details currently on file. | If the '''Insured buttons''' are used, the refund will be paid and sent '''using the details currently on file'''. | ||
}} | }} | ||
{{Img-proc-free | {{Img-proc-free | ||
Revision as of 12:23, 6 March 2025
This procedure explains how agents can submit a cancellation request for an NFIP policy.
This will not auto-issue and must be reviewed by Underwriting before it is cancelled. |
Procedural Steps
1. Policy Record

Open the Policy Record.
To start the policy cancellation process
- Find the Policy Actions block on the right
- Choose "Cancel Policy"
Policies cannot be cancelled because the insured no longer wants it.
There must be a Qualifying Reason.
There must be a Qualifying Reason.

This will open the NFIP Policy Cancellation page.
This page has the following sections:
- Qualifying Reason dropdown list
- Upload Cancellation Documents
- Cancellation Effective Date
- Cancellation Refund and Mailing Instructions
- Abandon: Exit the cancellation without submitting anything
- Submit: Create the Request Form and add any uploaded cancellation documents
2. Qualifying Reason
Choose the appropriate Qualifying Reason.
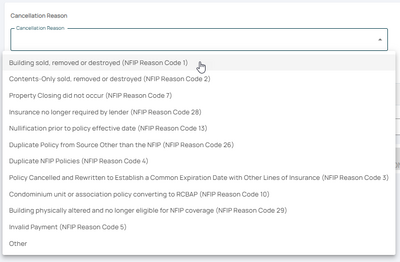
Choose the appropriate qualifying reason from the dropdown list

The NFIP Cancellation Qualifying Reasons are listed from the top-down based on how common they are.
For instance, most policies are cancelled after the sale of the building, which is at the top of the list.
- The Reason Codes are used for reporting to FEMA
- The Qualifying Reason will determine the cancellation effective date
- The Reason Code can be changed after submitting the request to Underwriting
3. Supporting Documentation
Upload the Supporting Documentation.
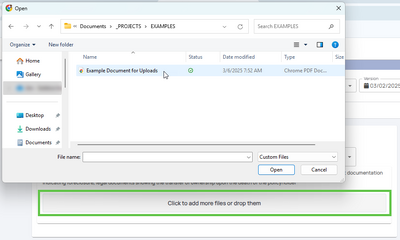
Upload supporting documentation for the cancellation 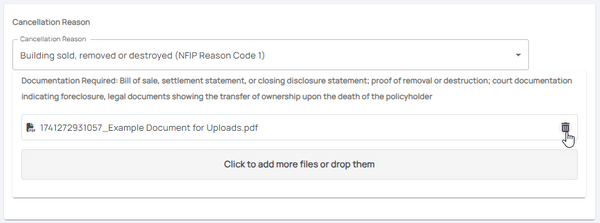

Select the button that shows "Click to add more files or drop them".
Upload any Required Cancellation Documents as shown under the Qualifying Reason, such as:
- Proof of sale (Reason Code 01)
- Duplicate declarations page (Reason Code 04)
- Cancellation Verification Letter (Reason Code 28)
Documents can be removed from this list after they are uploaded by clicking the Trash Can icon on the right.

4. Effective Date
Choose the correct Cancellation Effective Date.

Enter or choose the appropriate date. Effective dates chosen before the policy inception date may cause errors.

Underwriting may adjust the Effective Date based on details in the documents or the date the request was received.
5. Refund
If applicable, choose where the Refund should be sent.
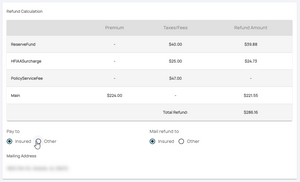
Confirm who will receive the refund and where it should be sent. 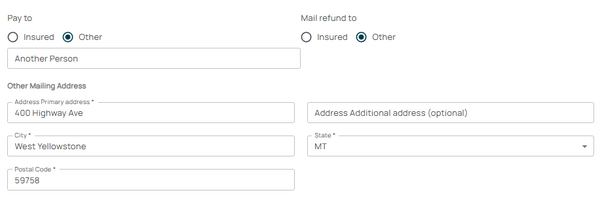 If "Other" is chosen, complete the form fields to adjust who is shown on the check and where it will be mailed.

The refund amount will be calculated by the effective date and the refund rules.
Below the calculation, the agent has options to choose who will be paid ("Pay to") and where the check will be mailed ("Mail refund to").
If the Insured buttons are used, the refund will be paid and sent using the details currently on file.
6. Review and Submit
* Review the entered information for accuracy and completeness.
- Submit the cancellation request through the Equinox platform for processing.