
Report Claim: Difference between revisions
No edit summary |
No edit summary |
||
| Line 47: | Line 47: | ||
|title = 2. Gather Information | |title = 2. Gather Information | ||
|content = | |content = | ||
{{collapsible-details | |||
|number = 21 | |||
|title = Claimant Information | |||
|content = | |||
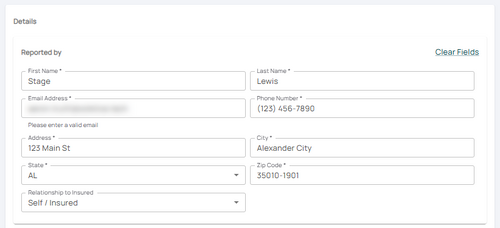
<big>Enter or confirm the details of the person who has stated the loss occurred.</big><br> | <big>Enter or confirm the details of the person who has stated the loss occurred.</big><br> | ||
The fields will prepopulate with the policyholder information, which must be updated. | The fields will prepopulate with the policyholder information, which must be updated. | ||
| Line 55: | Line 59: | ||
|caption = Confirm or update the claimants contact information. | |caption = Confirm or update the claimants contact information. | ||
}} | }} | ||
}} | |||
{{collapsible-details | |||
|number = 22 | |||
|title = Loss Date | |||
|content = | |||
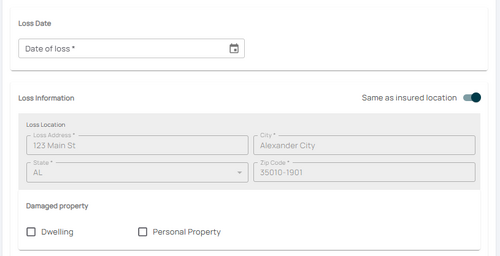
Scroll down to the '''Loss Date''' section and enter the date of loss. | Scroll down to the '''Loss Date''' section and enter the date of loss. | ||
* The loss cannot be a future date. The claim must have incurred damage to the subject property. | * The loss cannot be a future date. The claim must have incurred damage to the subject property. | ||
| Line 65: | Line 74: | ||
|caption = Enter the Date of Loss and confirm the loss location, including the type of property damaged. | |caption = Enter the Date of Loss and confirm the loss location, including the type of property damaged. | ||
}} | }} | ||
}} | |||
{{collapsible-details | |||
|number = 23 | |||
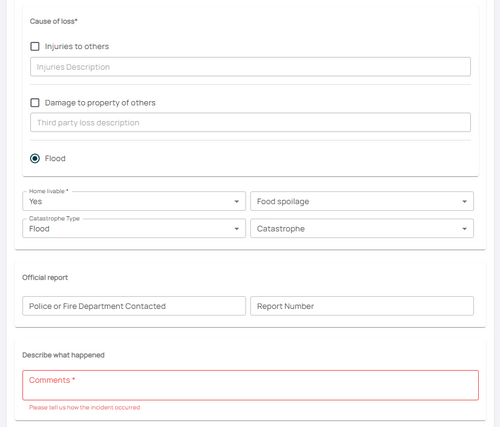
|title = Cause of Loss | |||
|content = | |||
Scroll down to the '''Cause of Loss''' section. | Scroll down to the '''Cause of Loss''' section. | ||
* Choose all applicable options. | * Choose all applicable options. | ||
| Line 74: | Line 88: | ||
|size = 500px | |size = 500px | ||
|caption = Enter the Cause of Loss. Add as much information as will be relevant to a Claims Adjuster. | |caption = Enter the Cause of Loss. Add as much information as will be relevant to a Claims Adjuster. | ||
}} | |||
}} | }} | ||
<!-- END OF COLLAPSIBLE SECTION --> | <!-- END OF COLLAPSIBLE SECTION --> | ||
Revision as of 16:48, 4 March 2025
This procedure explains how agents can submit a First Notice of Loss (FNOL) in the Equinox platform. This initiates the claims process for a policyholder after a loss event.
|
Procedural Steps
1. Open New Claim
A claim can be started one of two ways (A or B, not both), which requires access to the policy.

Find the button on the Agency Dashboard.
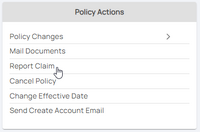
Use the "Policy Actions" menu along the right side of the page and click on "Report Claim"
A. Click the Report Claim button at the top of the Agency Workspace
- The next page will prompt to search for a policy number.
- Enter the policy number.
- Choose the correct policy from the list.


B. Start from the Policy Record
- Find the Policy Actions block on the right
- Choose Report Claim
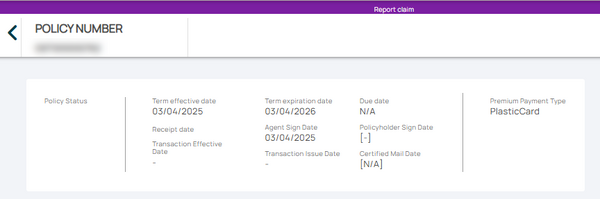
The Report Claim page will open with a summary of the policy term.

2. Gather Information
Claimant Information
Enter or confirm the details of the person who has stated the loss occurred.
The fields will prepopulate with the policyholder information, which must be updated.

Loss Date
Scroll down to the Loss Date section and enter the date of loss.
- The loss cannot be a future date. The claim must have incurred damage to the subject property.
- Confirm the Loss Location
- Confirm the property that was damaged (building, personal property, or both)

Cause of Loss
Scroll down to the Cause of Loss section.
- Choose all applicable options.
- Only the fields marked with an asterisk (*) are required; all other fields are optional.
- Enter as much information in the Comments section that would be relevant to a Claims Adjuster.

3. Confirm Contact Details

Scroll to the top of the page to enter the effective date.
- Backdating is not allowed.
- Enter today's date or a later effective date.
- Choose "None" for the Waiting Period.
4. Review and Submit
Review the changes for accuracy and completeness before finalizing.

Once the effective date is entered, click the Issue button.
- The "Abort" button will exit without saving any details.

The system will process the change immediately.
- A Declarations page with the updated information will be available in the Documents section of the Policy Record.
- If a Renewal Notice exists and the policy has not expired, then a new Renewal Notice will be sent to the updated payor.