
Submit Policy Assignment
This procedure explains how agents can request a policy assignment. A policy assignment transfers an NFIP policy from the current policyholder to a new policyholder due to a change in ownership.
|
Procedural Steps
1. Complete the Form
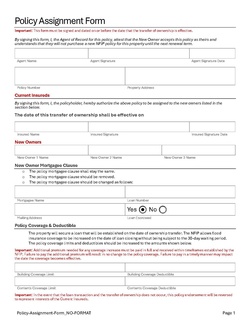 |
A specific form is not required to complete a Policy Assignment. However, the document shown here (click to open) has been created to assist agents with the process. Complete the following fields:
Add other details as applicable, such as the Mortgagee Clause or Primary Residence verification. Print or save the form, then upload it to the Policy Documents. |
2. Access Policy Record

To quickly navigate to the Policyholder section:
- Find the Policy Actions block on the right
- Choose Policy Changes
- From the next menu, click the Policyholder or Co-insured option
3. Add, Edit, Delete
This will open the Insured fields for editing.
Each insured (policyholder, co-insured, or additional insured) will have their own section for editing.

Changes to email address, phone number, and mailing address.
Update Insured Name
The policyholder’s name has been updated due to legal reasons (e.g., marriage, divorce).
Required Documentation: a signed request from the insured or legal document showing change to insured name
Correct Insured Name
The insurable interest does not change, but the policyholder’s name is incorrect.
Required Documentation: The agent must state that the name was incorrect on the application and there is no change to insurable interest

- Select "Individual", "Business", or "Legal Trust"
- Enter the contact details in the fields below.
- All starred fields are required.
The policyholder can be edited but not deleted.

Required Documentation: A signed request from the insured being removed or written evidence, like a deed, showing the insured no longer has insurable interest in the property.
4. Choose Effective Date

Scroll to the top of the page to enter the effective date.
- Enter the appropriate date.
- Backdating to the inception date is allowed for corrections.
- Choose "None" for the Waiting Period.
5. Review and Submit
Once the effective date is entered, click the Issue button.
- The "Abort" button will exit without saving any details.

The system will process the change immediately.
- A Declarations page with the updated information will be available in the Documents section of the Policy Record.
- If a Renewal Notice exists and the policy has not expired, then a new Renewal Notice will be sent.